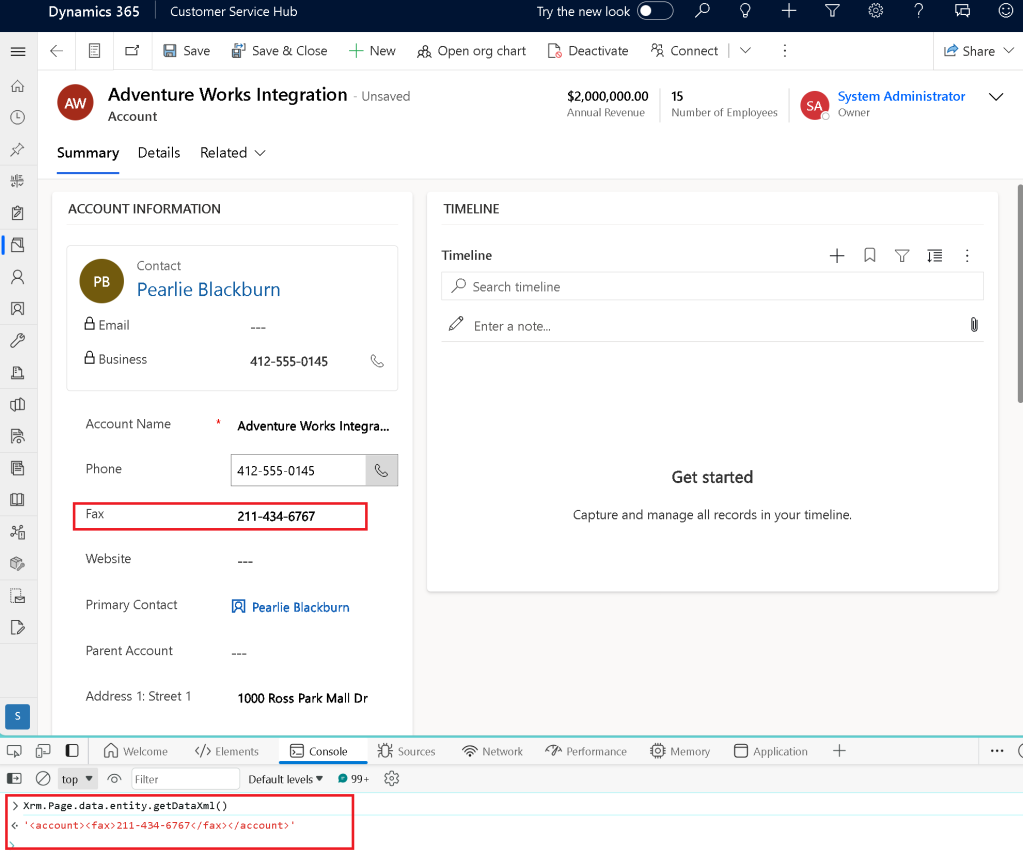
If you are seeing a form with ‘Unsaved’ tag and wondering how to figure out what field got updated with JavaScript, a simple way is to go to Console prompt and run :
We have a requirement to show an editable grid on a form. Whenever a user enters a value, if it meets certain criteria then we need to prompt a message and save the input on the record.
This approach basically prevents us from showing too many fields on the editable grid and we can have a popup window to capture a field value on demand.
For this, we are going to use just a prompt command and register JS on the subgrid – it’s pretty straightforward.
Below is the code we use:
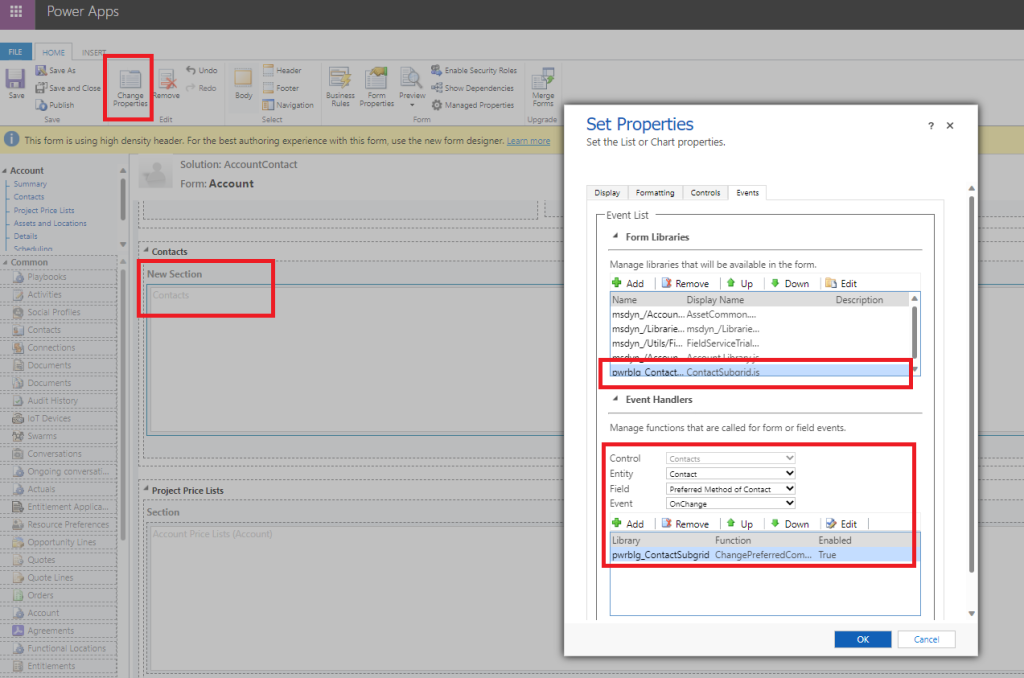
function ChangePreferredCommunication(executionContext)
{
   var context = executionContext.getEventSource();
   var parent = context.getParent();
   var methodcode = parent.attributes.get("preferredcontactmethodcode");
   var contactid = parent.getId().replace(/[{}]/g, "");
   if(methodcode.getValue() == 2){
      var userText = prompt("Please enter email", "Provide a email");
      var data =
      {
         "emailaddress1": userText
      }
   } else if(methodcode.getValue() == 3){
      var userText = prompt("Please enter telephone", "Provide a number");
      var data =
      {
         "telephone1": userText
      }
   }
   else
      return;
   Xrm.WebApi.updateRecord("contact", contactid, data).then(
      function success(result) {
      Xrm.Utility.alertDialog("Contact Method Saved", null);
   },
   function (error) {
      Xrm.Utility.alertDialog(error.message, null);
   }
  );
}
Registering web resources on subgrid
Now once you have registered the event, you can change the preferred method of contact and you will be prompted in a message box to enter text.
The example here can be used for adding new notes too.
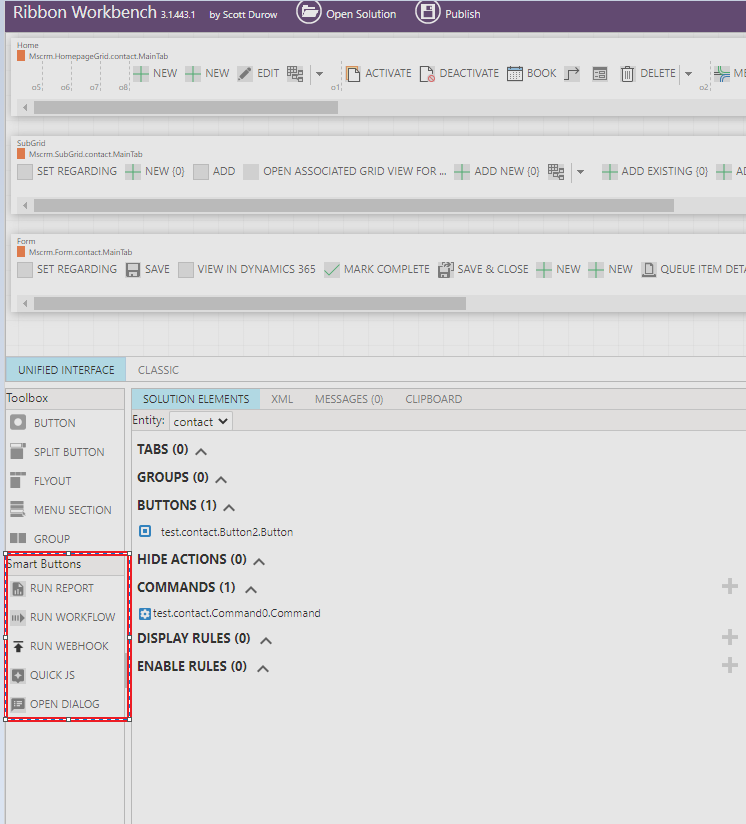
Smart Button provides a unusually easy way to deal with the ribbon button ordeal. You just need to install the solution for smart button after ribbon workbench and then use ribbon workbench which will then show the Smart Button option.
Step 3: Open Ribbon Workbench and left side will show below option :
You get option to:
Run Report
Run Workflow
Run Webhook
Quick JS
Open Dialog.
In this example, we are trying to open canvas app from ribbon button and passing parameter.
Lets create a environment Variable by the name test_CanvasAppUrl which will have the URL of canvas app.
We will configure it on Smart Button as shown passing the environment variable in as URL {%environmentvariable%}
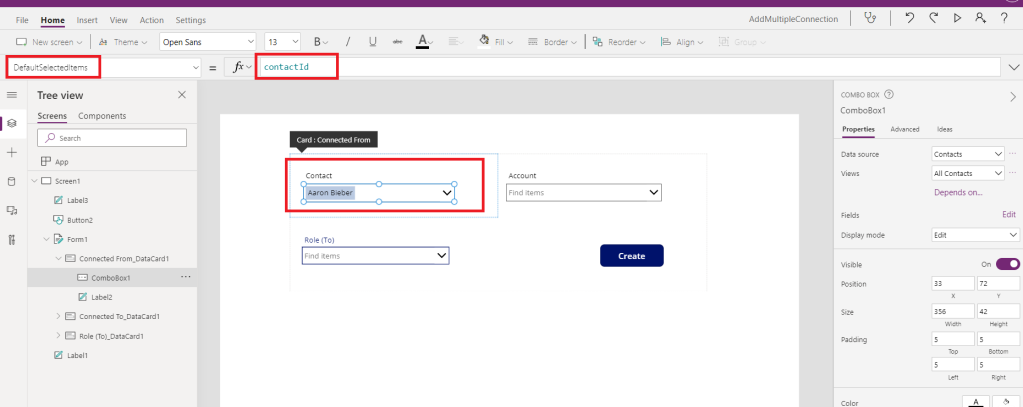
The Smart Button create JS in the backend which then pass two paramter in the URL of canvas app:
recordId
recordLogicalName
You can consume them as below in your canvas app. We are setting the variable with recordId and recordLogicalName and then mapping the variable to a combobox control so that whenver our app loads, the contact combobox is auto filled.
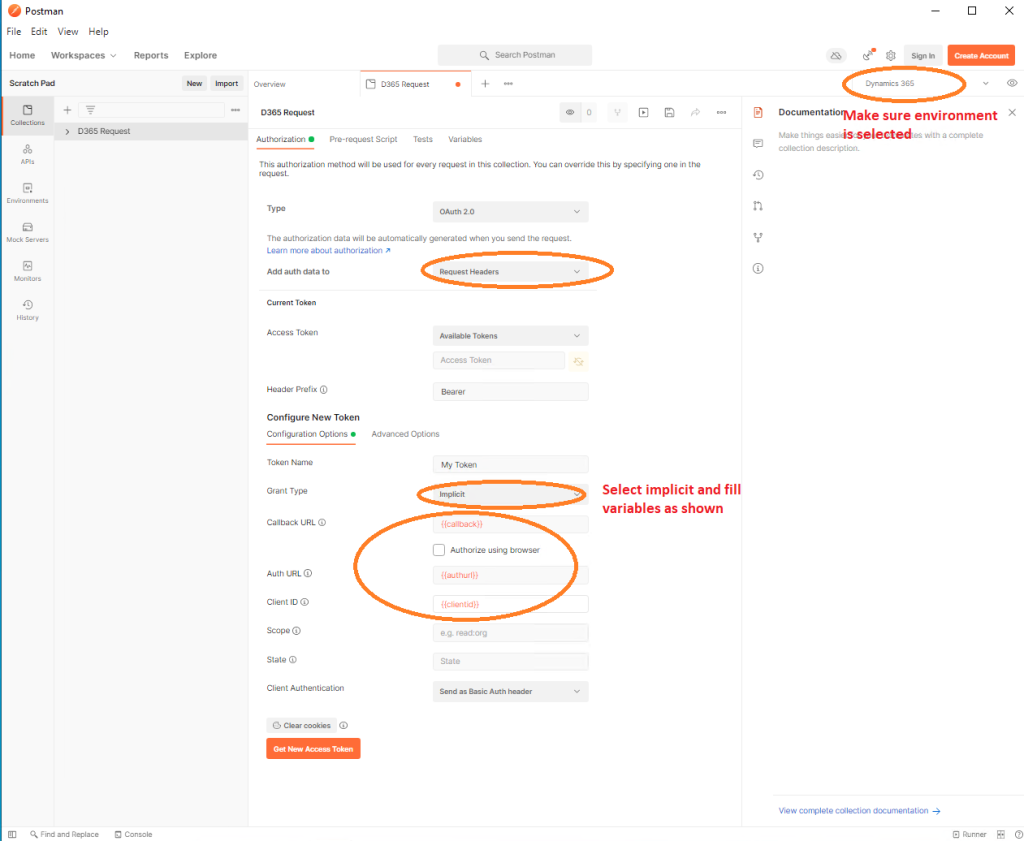
This is a pretty straightforward setup. Postman can be called a browser on steroid – it can send HTTP request to our D365 instance and get the result. To set it up, you need to consider 3 areas in Postman.
Environment
Collection
Request
We will start with each one of them in sequence.
Create Environment with Below Variables:
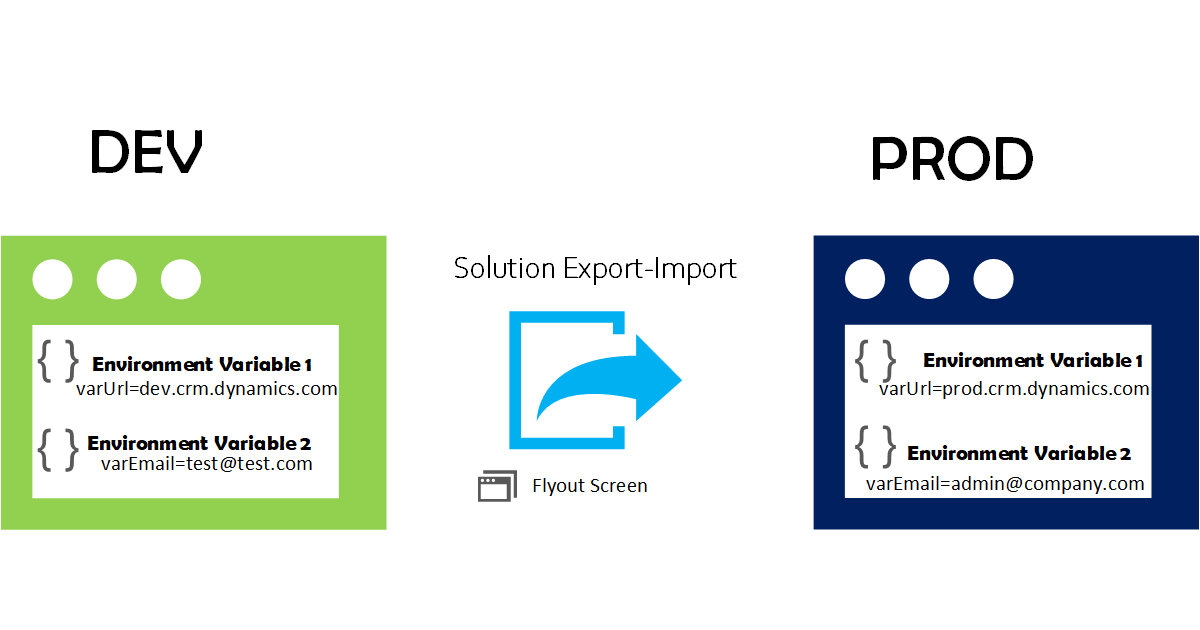
Environment can be used mainly to store dependent variables – so we can have one set for Prod and another for Test.
Environment variable enable us to package the configuration along with customization in a single solution. This help us in eliminating the custom entity we use to create in Dynamics which were environment dependent like Url/ email address/ Integration points etc.
Lets do step-by-step process to create and migrate configuration.
We will start by creating one solution and adding Environment Variable to it.
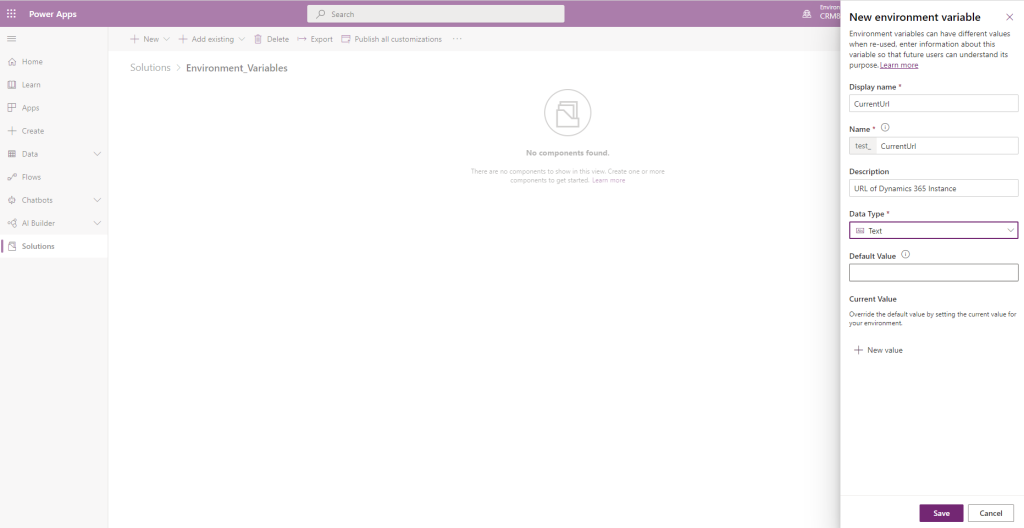
We will create two EV
CurrentUrl
SenderEmail
Both these variable are usually environment dependent. While the URL denotes the D365 instance, the email can be sender email address for which mailbox is configured. We can keep the type as Number/Text/JSON/Data Source. We will stick with Text type only.
The CurrentUrl variable is neither having Default Value nor Current Value.
The SenderEmail variable is having current value but no default value.
These two are important field which we need to pay attention to. Once created, we will export and import the solution.
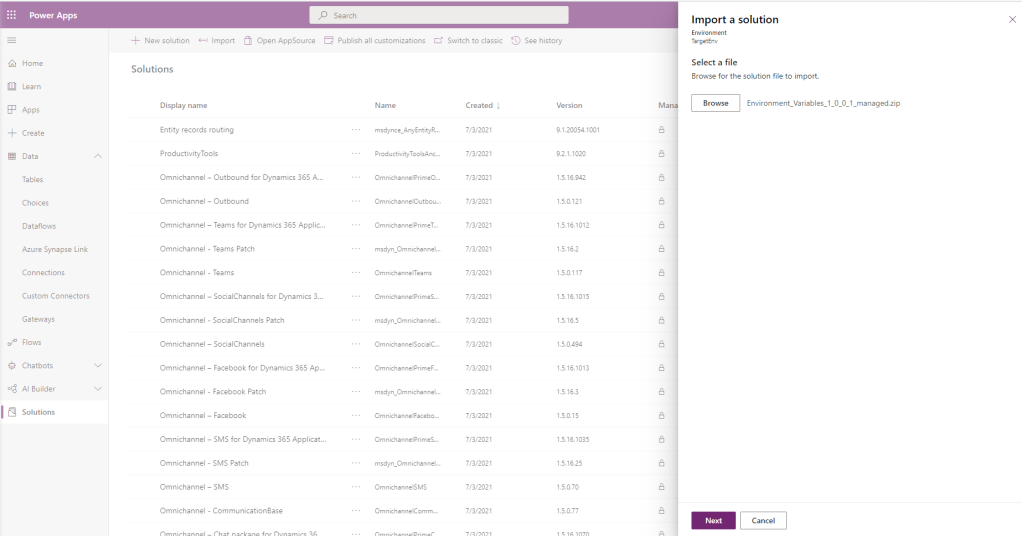
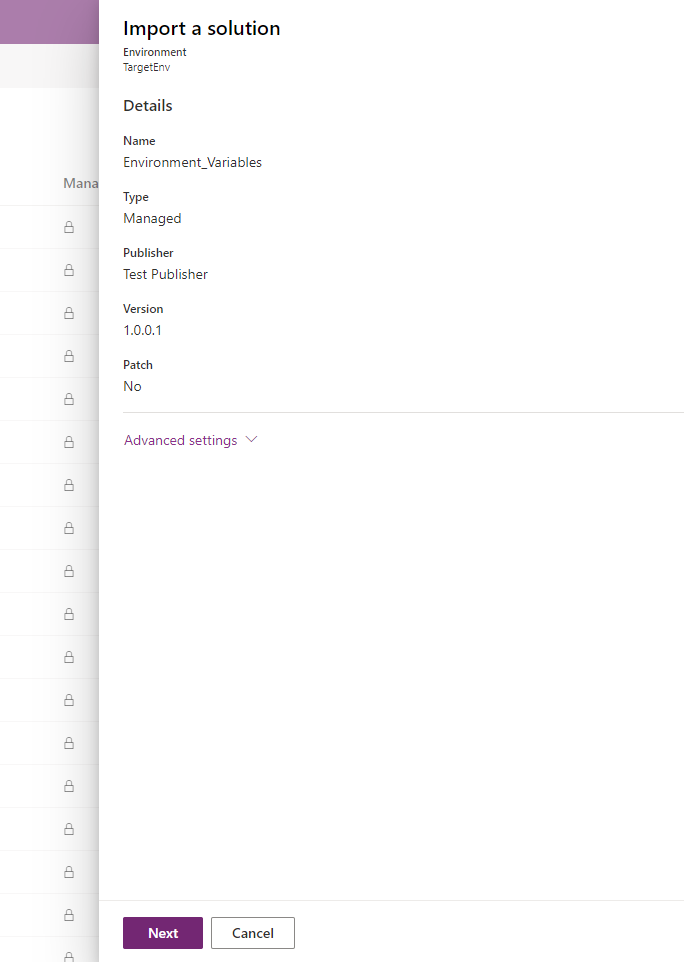
We are importing managed solution – unmanaged is straight forward.
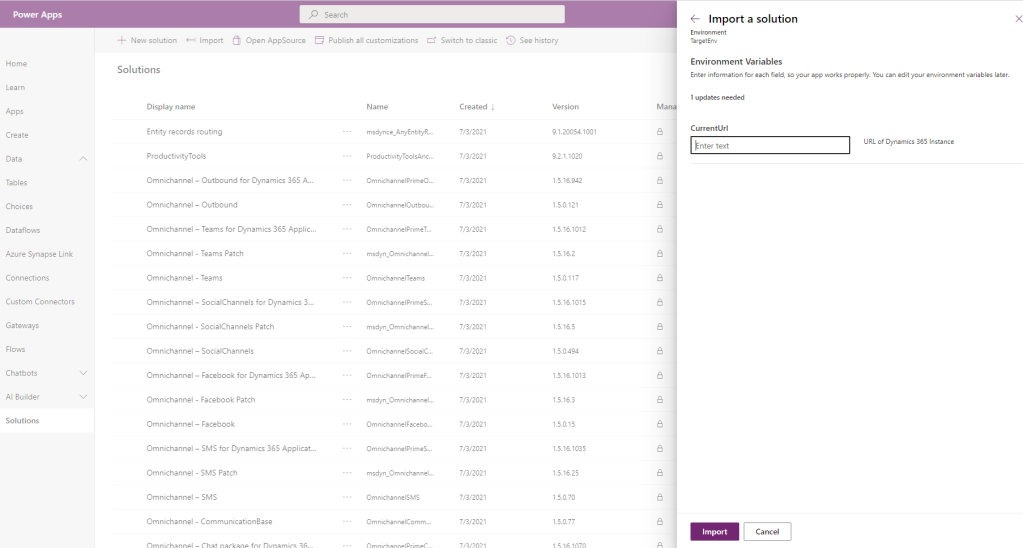
You will see a Flyout option asking for value of CurrentUrl. If you remember, we didn’t provide value for this in source environment and that is why we need to provide value before importing the solution. But if you have already given the current or default value in source then the flyout menu will NOT appear.
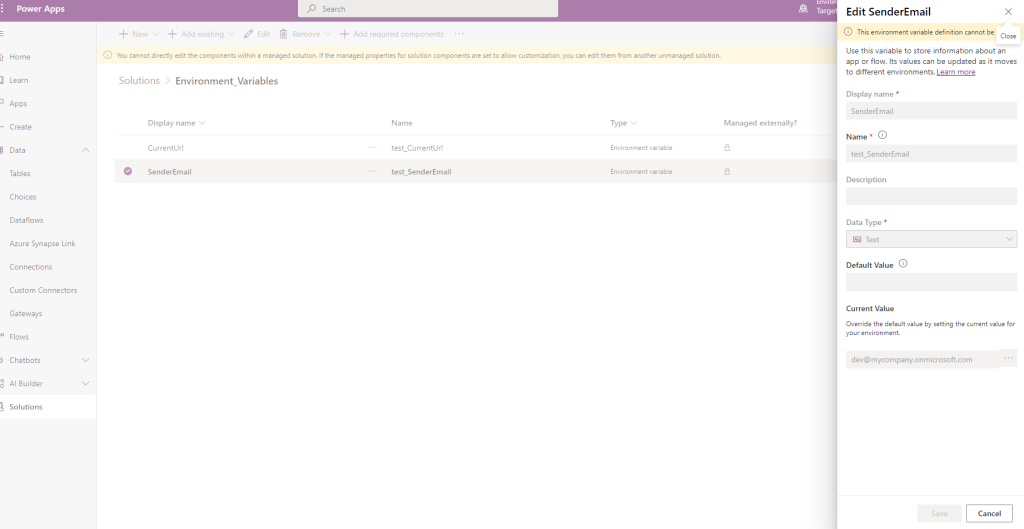
Once imported, if you open the solution then it will not be editable. This is a product behavior (bug?) where it doesn’t allow you to update the config value in the managed solution. If it was unmanaged then it would have been editable.
Now to edit the value, you need to modify the default solution. This can be done by going directly to the table menu or going to default solution or even in advanced find.
Other option is to modify the solution zip file – but lets skip that.
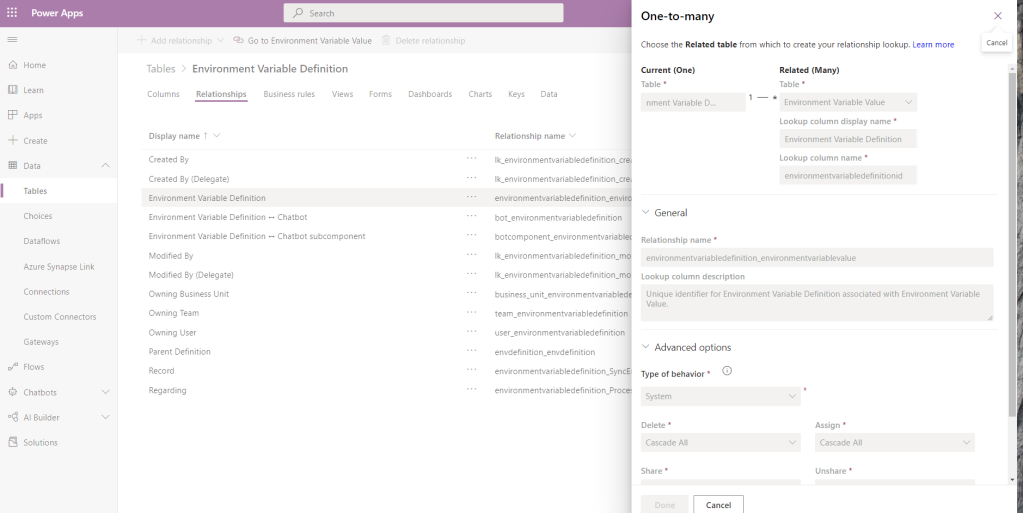
Do remember that environment variable is nothing but two table(entities) in Dataverse (Dynamics 365). The two tables are :
Environment Variable Definition
Environment Variable Value
These two table are 1:N with plugin enforcing 1:1 relationship.
So if you try to add more than one Environment Variable Value for a Definition, you will get an error.
In Power Automate, you will see the Environment Variable under the section as shown below.
In Canvas App, if you are using it as Data Source then you can go to Setting and enable the checkbox.
Otherwise, You can read the Environment Variable just like any other table.
Then you can read the variable just like any row in Dataverse
Below are steps to create a ‘lead with attachment’ from an ‘incoming email with atachment’.
Lets trigger the power automate flow when the email is created in CRM with direction as incoming. We dont want outgoing email to be converted to lead 🙂
Here we can add further filters like excluding a domain, or checking if body contaiin certain keywords etc
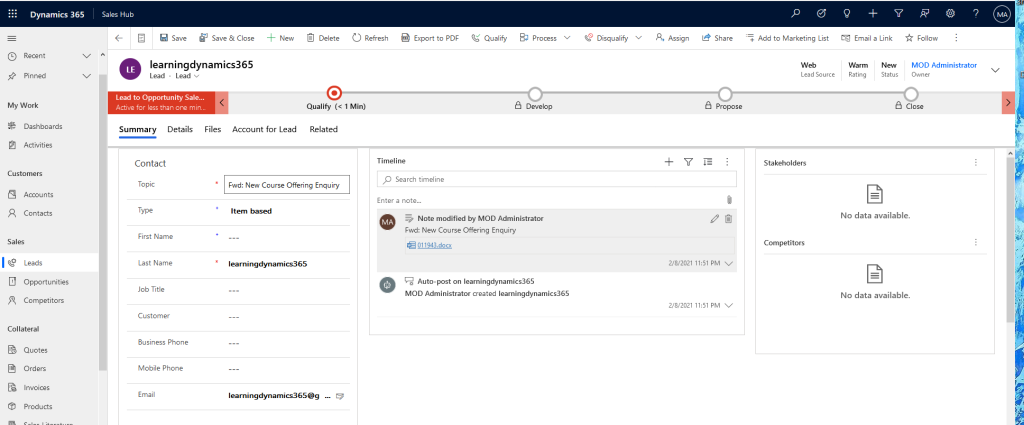
To create a lead, we put the below component in ‘If Yes’ block. We will fill in the username of the email address as the lastname. This might not be preferred choice, but it can be configured as per requirements.
Also, we want to store the email text to description field. Now since the description might have HTML tag which we dont want in our description field – we are using a HTML to text conversion service.
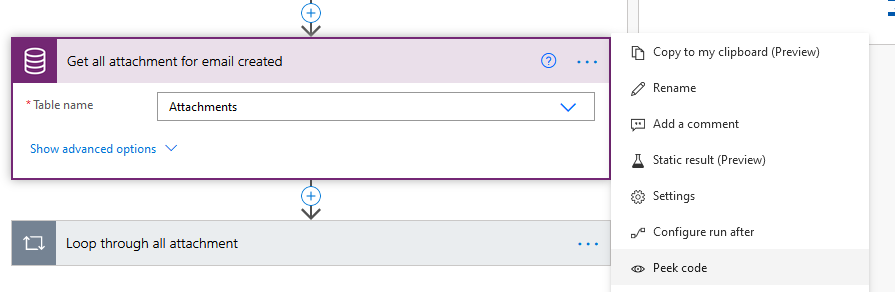
Next we want to find all the attachment linked to this email message. Here we can simply loop through attachment entity.
Please note that you will see two drop down for attachment – one is attachment and other is activitymimeattachment
We need to select activitymimeattachment. So select attachment and then right click to peek code to be sure you selected the correct one,
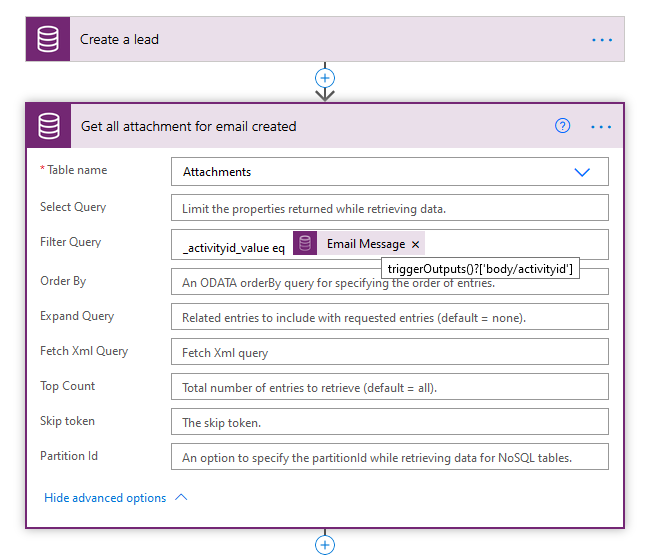
We are applying filter to get only the attachment of email message as shown :
Remember to use “_activityid_value” and not just “activitiyid” else you will get error message :
“Could not find a property named ‘activityid’ on type ‘Microsoft.Dynamics.CRM.activitymimeattachment’.”
Now we can loop through all the attachment and create annotation(notes) for all the files.
Please note not to fill in the “object type” with entity type when you are specifying the type in regardingobject directly else you might get following error.
The entity with a name = ‘4’ with namemapping = ‘Logical’ was not found in the MetadataCache. MetadataCacheDetails: ProviderType=Dynamic, StandardCache=True, IsLoadedInStagedContext = False, Timestamp=7862004, MinActiveRowVersion=7862004, MetadataInstanceId=21976159, LastUpdated=2021-02-06 09:25:40.947
Also the format of regardingobjectid should be /leads/GUID
A very common request by customer is to get total number of record in D365 system for a given entities. It is pretty straight forward for D365 On Prem, you can do a count on SQL DB. But for D365 online you either need to rely on XrmToolBox fetch counter(which can still be used) or aggregrate function or even on DES database. However we do have a simple way now : RetrieveTotalRecordCount
I have all the entities in my system stored in a text file. The C# code to get count of all the entities will be like this:
            string[] entitylist = File.ReadLines(@"D:\entitylist.txt").ToArray();
            var client = new CdsServiceClient(connectionString);// I am using .NET core. Change it to var client = new CrmServiceClient(connectionString);
            RetrieveTotalRecordCountRequest req = new RetrieveTotalRecordCountRequest
            {
                EntityNames = entitylist
            };
            EntityRecordCountCollection m = ((RetrieveTotalRecordCountResponse)client.Execute(req)).EntityRecordCountCollection;
            long count = 0;
            foreach (var i in m)
            {
                Console.WriteLine(i.Key + " =" + i.Value);
                count += i.Value;
            }
            Console.WriteLine(@$"Count ={count}");
I was having around 600 entitites with 200 million records in total and it took 2 second to get the result. So pretty sure its doing SQL count underneath.
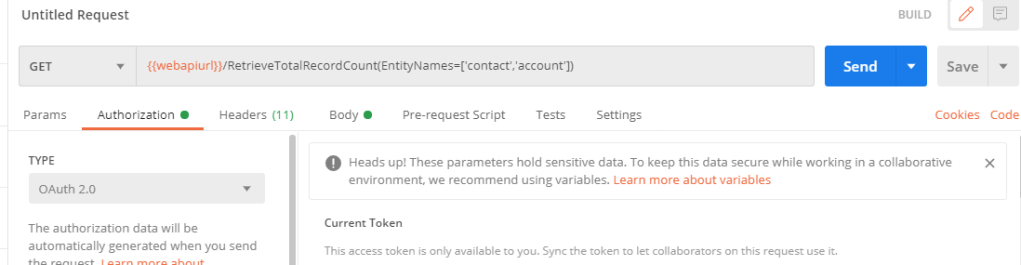
If you are using POSTMAN – just use below url
GET {{webapiurl}}/RetrieveTotalRecordCount(EntityNames=[‘contact’,’account’])
and it ifs JS then just change pass the same request as above using webAPI.
function GetTotalCount(executionContext)
{
	var formContext = executionContext.getFormContext();
    var req = new XMLHttpRequest();
    req.open("GET", Xrm.Page.context.getClientUrl() + "/api/data/v9.1/RetrieveTotalRecordCount(EntityNames="+JSON.stringify(['contact','account']) +")", true);
    req.setRequestHeader("OData-MaxVersion", "4.0");
    req.setRequestHeader("OData-Version", "4.0");
    req.setRequestHeader("Accept", "application/json");
    req.setRequestHeader("Content-Type", "application/json; charset=utf-8");
    req.setRequestHeader("Prefer", "odata.include-annotations=\"*\"");
    req.onreadystatechange = function() {
        if (this.readyState === 4) {
            req.onreadystatechange = null;
            if (this.status === 200) {
                var results = JSON.parse(this.response);
                for (var i = 0; i < results.EntityRecordCountCollection.Count; i++) {
                    var value = results.EntityRecordCountCollection.Values[i];
                    alert(results.EntityRecordCountCollection.Keys[i] + " = "+ value);
                }
            } else {
                Xrm.Utility.alertDialog(this.statusText);
            }
        }
    };
    req.send();
}
So recently I recieved a query that importing cases record with Completed status wasnt working using OOB import. This was for data migration and its pretty common to migrated closed cases for historic purposes.
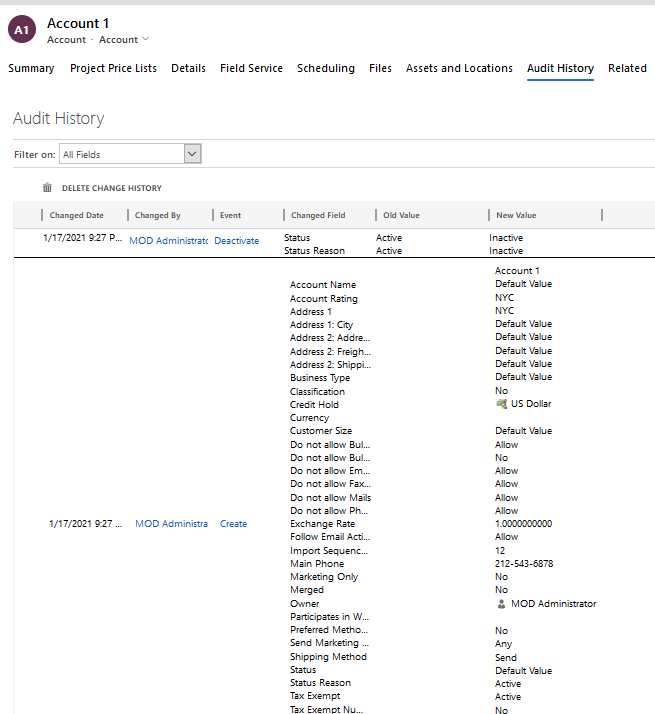
So D365 does allow importing inactive record for certain entity – like account.
Account
Below is an example of sample :
If you see the Audit however, you can see that it is a two step process – where record gets created in active stage and then gets deactivated.
Case
Lets consider incident entity now. To reoslve a case from UI, you need to fill these details. This in turn creates a case resolution entity record which then closes the cases. So to reoslve a case we need to import Case Resolution entity.
Please note that cases can be imported in cancelled state directly – it is only the resolve status that isn’t allowed to be imported directly.
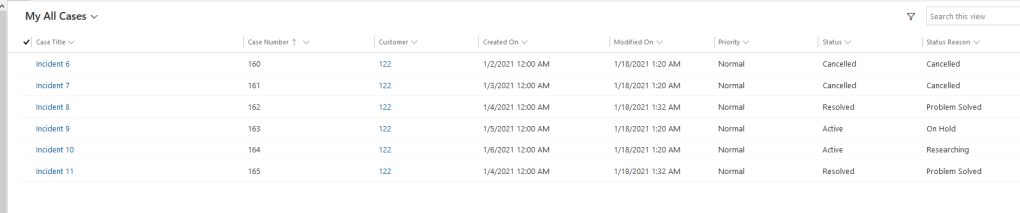
When we to import below file, the same behaviour isn’t repeated:
However, the import partially succeed with proper error message:
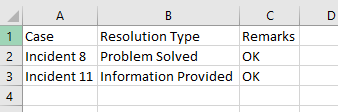
To resolve the imported cases, we need to import similar file to this entity. What is will do is create a similar file in below format and import it.
D365 does NOT provide a template for Case Resolution so you need to import it as a CSV.
This will then resolve the two cases Incident 8 and Incident 11. You can add any other requirted field like Actual End Date – all those will work fine.
Please note that Dynamics is not considering the status reason field while importing and it just takes the default status reason field for given status.
I was however not able to pass both account and contact – so if the lead has already ‘Existing Account’ field filled and you pass the contact in webAPI call, then you will get both account and contact filled in the opportunity record.
function qualifyLeadwithContact(leadId, contactid, clientUrl) {
    try {
        var request = "leads(" + leadId.replace("}", "").replace("{", "") + ")/Microsoft.Dynamics.CRM.QualifyLead";
        var postdata = {
			"CreateAccount":false,
			"CreateContact":false,
			"CreateOpportunity":true,
			"OpportunityCustomerId":{"@odata.type":"Microsoft.Dynamics.CRM.contact","contactid":contactid},
			"Status":-1,
			"SuppressDuplicateDetection":true
				};
        var req = new XMLHttpRequest();
        req.open("POST", clientUrl + "/api/data/v9.0/" + request, true);
        req.setRequestHeader("Accept", "application/json");
        req.setRequestHeader("Content-Type", "application/json; charset=utf-8");
        req.setRequestHeader("OData-MaxVersion", "4.0");
        req.setRequestHeader("OData-Version", "4.0");

        req.onreadystatechange = function () {

            if (this.readyState == 4) {
                req.onreadystatechange = null;

                if (this.status == 200 || this.status == 204) {
                    var result = JSON.parse(this.response);

                } else {
                    var error = JSON.parse(this.response).error;
                }
            }
        };
        req.send(JSON.stringify(postdata));

    } catch (e) {
        throwError(functionName, e);
    }
}
Lets discuss ‘compose’ component under Data Operation in Power Automate. The official doc describe it as “Use the Data Operation – Compose action to save yourself from having to enter the same data multiple times as you’re designing a cloud flow. “
So basically you can store the input here something like this:
The main question that arises is why to use Compose when we have “Initialize Variable” component allready there. Here is how Initilize variable work:
The main differencei s ‘Performance’. So while variable can be setup multiple times, the Compose is more like a constant which can only be initialized once. This give a performace boost when using Compose compared to variable.
Just a run over a big array and doing same operation shows the differnece in the performance.
So if you are intializing a value just once and dont wish to modify it later – use compose. Use variable only when data modification is needed.